Illustration

Sketchbook Tutorial: How to Create a Winter Postcard with Acrylic Paint

Transform an accordion notebook into a perfect postcard to rule this holiday season with inks and markers

The season of parties and celebrations is approaching without giving us a break. A time full of special moments to share with family and friends, but also a real puzzle for those trying to find the perfect gift or be original in the dreaded invisible friend.

In this video tutorial, the illustrator Maru Godàs (@marugodas) proposes you create an original and handmade gift: your own notebook illustration in the shape of an accordion to transform it into a winter postcard[/b], with lights included, perfect for giving as a gift or decorating your home this holiday season.

Follow the entire process in the following sketchbook video tutorial and discover how to win a Domestika course by participating in the #PostalDomestika challenge that we present at the end of the article!

Materials needed to make the postcard

The objective of this postcard is for you to exploit all your creativity, that is why we encourage you to use the techniques and materials that you like the most. If you want to follow the complete process with Maru, these are the basic materials that you cannot miss:

- Parchment type paper.
- Colored cardboard.
- Acrylic-based inks and marker.
- Brushes of different sizes.
- Pallette.
- Cutting base + metal ruler and cutter.
- Folder.
- White or colored lights.
- Sketch with the divisions of each plane.

Pro By marugodas in Sketchbook Tutorial: How to Create a Winter Postcard with Acrylic Paint 30.10.2023 at 17:29
" href="https://cdn.domestika.org/c_fill,dpr_auto,f_auto,q_auto/v1698683371/content-items/014/495/197/1-original.png?1698683371">Use the materials that inspire you the most to create your own winter postcard.
Use the materials that inspire you the most to create your own winter postcard.

How to build the accordion notebook?

The basis of this postcard is an accordion notebook. This structure allows you to fold the postcard to transport it as a sketchbook, as well as place iton any surface as a decorative.

Place your sheet of parchment paper on your work table. In this case, Maru uses a 70x100 cm sheet, but you can adapt the measurements depending on the illustration you are going to paint. Mark the first folds with a ruler, leaving a few centimeters at each end and use the folder to fold the tabs gently.

Repeat this process, leaving wider spaces between each fold and without marking them too much to prevent paint from accumulating in these areas. Once you have the entire sheet folded in an accordion shape, cut the upper corners of the tabs, this will allow you to glue the covers once the illustration is finished.

Pro By marugodas in Sketchbook Tutorial: How to Create a Winter Postcard with Acrylic Paint 30.10.2023 at 17:29
" href="https://cdn.domestika.org/c_fill,dpr_auto,f_auto,q_auto/v1698683371/content-items/014/495/199/ezgif.com-video-to-gif-5-original.gif?1698683371">
With a ruler and a folding knife, fold the sheet until you obtain an accordion.

Start painting the postcard

Her career in the world of painting and creation of [i] sketchbooks [/ i] by Maru have led her to travel to different corners of the planet, filling her notebooks with inspiration and unusual landscapes.

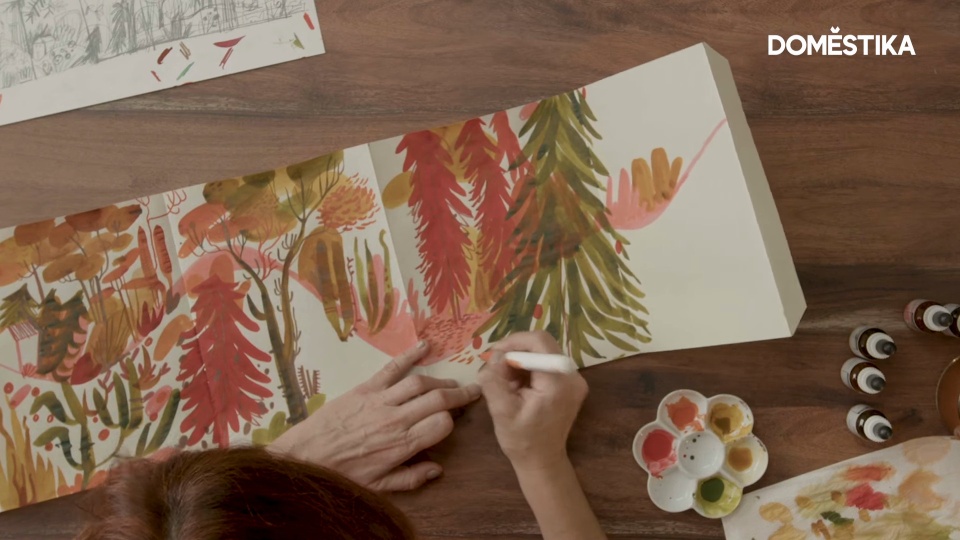
Once you finish preparing your sheet, it is time to start painting. The first thing you should do is define the structural lines of your drawing, in the case of Maru, the mountain that runs from left to right throughout the illustration. The idea is that you work in layers of colorso that you achieve different levels of depth in the landscape. A tip that can help you is to work on all sides at the same time, that is, use the same color over the entire surface until you are satisfied and move on to the next until you have achieved the composition you are looking for.

Pro By marugodas in Sketchbook Tutorial: How to Create a Winter Postcard with Acrylic Paint 30.10.2023 at 17:29
" href="https://cdn.domestika.org/c_fill,dpr_auto,f_auto,q_auto/v1698683371/content-items/014/495/201/ezgif.com-video-to-gif-7-original.gif?1698683371">
Use stems to mark the main structure of your illustration.

How to work with colors

Maru uses inks because on this type of paper they offer a translucent finish perfect for achieving the layered effect. The key is not to use too much water, since excess creates roughness in the paper and can accumulate in the folds. Try to balance the presence of colors or add more elements in the areas where you want to focus attention.

We encourage you to find your inspiration in different elements so that your postcard is unique, but if you need a guide, in the Maru course, Acrylic painting step by step: create incredible landscapes, you will discover the keys to mastering landscape painting.

Pro By marugodas in Sketchbook Tutorial: How to Create a Winter Postcard with Acrylic Paint 30.10.2023 at 17:29
" href="https://cdn.domestika.org/c_fill,dpr_auto,f_auto,q_auto/v1698683372/content-items/014/495/203/ezgif.com-video-to-gif-8-original.gif?1698683372">
Work the color layers with acrylic inks.

Add the final details with a marker

With the layers and color elements ready, it is time to finish the postcard with finer strokes as details. In this case, Maru uses markers to achieve greater precision and opacity.

With a landscape as organic as this one, the roots, tree branches and veins of the leaves are elements that allow you to play with drawing and colors. If you have different types of markers, you can continue working on the layers with different finishes and opacities.

Pro By marugodas in Sketchbook Tutorial: How to Create a Winter Postcard with Acrylic Paint 30.10.2023 at 17:29
" href="https://cdn.domestika.org/c_fill,dpr_auto,f_auto,q_auto/v1698683372/content-items/014/495/205/ezgif.com-video-to-gif-9-original.gif?1698683372">
Use markers with different finishes for the final details.

Place the colored covers

With the postcard finished, you are going to add some colored covers for a more professional finish that will allow you to transport it. Use two colored cards, chosen based on the illustration your postcard contains, to make the covers.

Stick the double-sided tapeon the two parts of the tongue, stick one of the cards and add more double-sided tape on its surface. Now you just have to glue the second cardstock, making sure to square it with the tab and the base cardstock so that it doesn't end up crooked. At the cutting station, use the ruler and cutter to cut off the excess. Repeat the same process on the other end of the postcard.

Pro By marugodas in Sketchbook Tutorial: How to Create a Winter Postcard with Acrylic Paint 30.10.2023 at 17:29
" href="https://cdn.domestika.org/c_fill,dpr_auto,f_auto,q_auto/v1698683372/content-items/014/495/207/ezgif.com-video-to-gif-10-original.gif?1698683372">
Glue two pieces of cardstock to the tabs to create the postcard covers.

Illuminate the postcard with white lights

You already have your finished postcard, but if you want to elevate the final result, we recommend that you add some lights. They have to be battery-powered lights that are light, for example, with a wire cable that allows you to shape the path. It is very important that you use LED lights, since they do not heat up and in contact with the paper, there is no risk of catching the postcard on fire.

You simply have to turn your postcard over and, carefully, stick the lights with tape. You can play with them as much as you want, create different shapes or concentrate them on some elements to highlight.

Once you are satisfied with the result, place the postcard right side up on any surface and turn on the lights to see the final result.

Pro By marugodas in Sketchbook Tutorial: How to Create a Winter Postcard with Acrylic Paint 30.10.2023 at 17:29
" href="https://cdn.domestika.org/c_fill,dpr_auto,f_auto,q_auto/v1698683372/content-items/014/495/209/4-original.png?1698683372">Place the lights and bring your winter postcard to life.
Place the lights and bring your winter postcard to life.

Participate in the #PostalDomestika challenge

Creativity is the best gift, that's why we want you to continue experimenting on your path in the world of illustration with the challenge #PostalDomestika for these holidays. Participate by following these two simple steps:

1. Create your own winter postcard and share it on your Instagram with the hashtag #PostalDomestika in video reel format or in a post.

2. Tag @domestika and @marugodas.

3. Consult the legal bases and participate in the draw for your favorite course by Maru Godàs.

Go ahead and show us all your creative potential!

Pro By marugodas in Sketchbook Tutorial: How to Create a Winter Postcard with Acrylic Paint 30.10.2023 at 17:29